# Angular :: Component - 1

- Author: @baealex
- Published: 2023-10-16
- Updated: 2023-11-17
- Source: http://blex.me/@baealex/2023-10-16-til-angular-component-1
- Tags: 앵귤러

---

## Component

컴포넌트는 앵귤러에서 뷰를 구성하기 위한 기본적인 단위인데 컴포넌트는 아래와 같이 구성되어 있다.

- 컴포넌트의 적용할 css 셀렉터

```ts
@Component({
    selector: 'app-example',
})
```

- HTML 템플릿

```ts
@Component({
    selector: 'app-example',
    template: `
        <p>Hello, World!</p>
    `,
    // or
    // templateUrl: './example.component.html'
})
```

- 컴포넌트의 스타일

```ts
@Component({
    selector: 'app-example'
    template: `
        <p>Hello, World!</p>
    `,
    styles: [
        'p { font-weight: bold; }',
    ]
    // styleUrls: ['./example.component.css']
})
```

- 동작을 정의한 클래스

```ts
@Component({
    selector: 'app-example'
    template: `
        <p (click)="handleClick()">Hello, World!</p>
    `,
    styles: [
        'p { font-weight: bold; }',
    ]
    // styleUrls: ['./example.component.css']
})
class ExampleComponent {
    handleClick() {
        console.log("Hello, World!")
    }
}
```

#### Life Cycle

1. `OnChanges`: 바인딩된 프로퍼티 값이 변경될 때 실행
2. `OnInit`: 바인딩된 입력 프로퍼티 값이 할당된 후 실행 (1회)
3. `DoCheck`: Angaulr가 감지하지 못하는 변화를 체크할 때 사용할 수 있으나 자주 실행되는 메서드이므로 무거운 동작을 두어서는 안된다.
4. `AfterContentInit`:
5. `AfterContentChecked`:
6. `AfterViewInit`:
7. `AfterViewChecked`:
8. `DoCheck`
9. `AfterContentChecked`
10. `AfterViewChecked`
11. `OnDestroy`: 디렉티브나 컴포넌트를 종료하기 전에 실행

#### Capsulation

컴포넌트 캡슐화는 스타일링에 영향을 미치는 요소인데 아래와 같이 3가지의 옵션을 제공한다.

```ts
import { ViewEncapsulation } from '@angular/core';

ViewEncapsulation.ShadowDom
ViewEncapsulation.Emulated
ViewEncapsulation.None
```

###### ShadowDom

```ts
@Component({
    selector: 'app-shadow-dom-component',
    template: `
        <div class="shadow-dom-component">
            <h1>Shadow DOM Component</h1>
            <p>
                This component is using Shadow DOM. This means that the styles
                defined in the component's stylesheet will not leak out to the
                rest of the application.
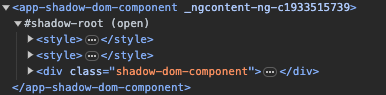
            </p>
        </div>
    `,
    styles: [`
        .shadow-dom-component {
            border: 1px solid black;
            padding: 1rem;
        }

        p {
            color: green;
        }
    `],
    encapsulation: ViewEncapsulation.ShadowDom
})
```

`ShadowDom` 로 설정한 경우 컴포넌트 삽입시 쉐도우 루트 안으로 생성되며 컴포넌트의 스타일도 쉐도우 루트 안에서 생성되므로 외부에 영향을 주지 않는다.

<img alt="" class="lazy" data-src="/resources/media/images/content/2023/10/16/2023101621_nKipMUIUmZGOO2EA180X.png" src="/resources/media/images/content/2023/10/16/2023101621_nKipMUIUmZGOO2EA180X.png.preview.jpg"/>

결과는 아래와 같이 표기된다.

<img alt="" class="lazy" data-src="/resources/media/images/content/2023/10/16/2023101621_BkasgFiVLmFzDAyac8h6.png" src="/resources/media/images/content/2023/10/16/2023101621_BkasgFiVLmFzDAyac8h6.png.preview.jpg"/>

###### Emulated

```ts
@Component({
    selector: 'app-emulated-component',
    template: `
        <div class="emulated-component">
            <h1>Emulated Component</h1>
            <p>
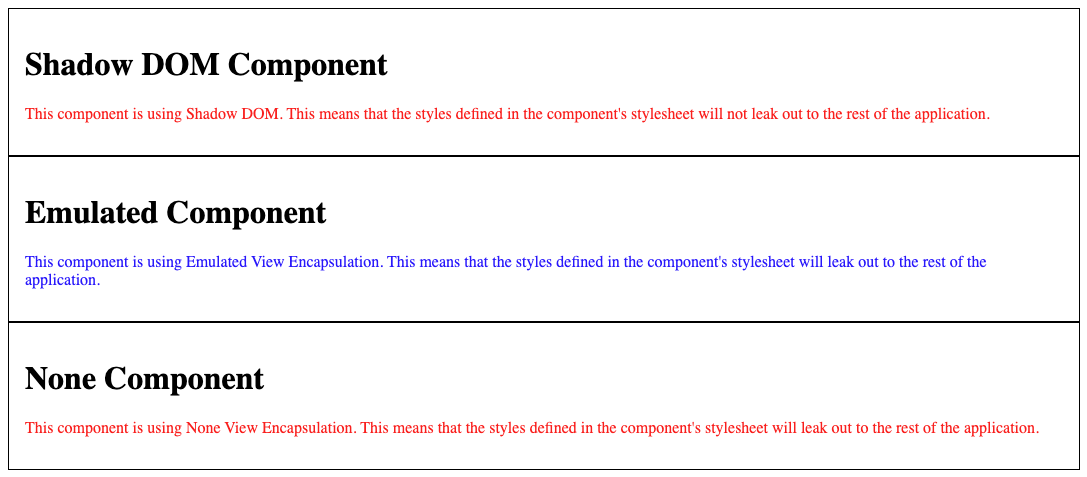
                This component is using Emulated View Encapsulation. This means that
                the styles defined in the component's stylesheet will leak out to the
                rest of the application.
            </p>
        </div>
    `,
    styles: [`
        .emulated-component {
            border: 1px solid black;
            padding: 1rem;
        }

        p {
            color: blue;
        }
    `],
    encapsulation: ViewEncapsulation.Emulated
})
```

`Emulated` 로 설정한 경우에는 쉐도우 루트안에 들어가지 않고 스타일도 헤더에 생성되지만 앵귤러에 의해 임의로 생성된 속성이 컴포넌트의 추가되며 컴포넌트의 스타일이 해당 속성안에서만 적용되기 때문에 외부에 영향을 주지 않는다.

<img alt="" class="lazy" data-src="/resources/media/images/content/2023/10/16/2023101621_kMFUXUpHBwMeX6pfYamg.png" src="/resources/media/images/content/2023/10/16/2023101621_kMFUXUpHBwMeX6pfYamg.png.preview.jpg"/>

결과는 아래와 같이 표기된다.

<img alt="" class="lazy" data-src="/resources/media/images/content/2023/10/16/2023101621_tcsktATkkypVsGxOuGtk.png" src="/resources/media/images/content/2023/10/16/2023101621_tcsktATkkypVsGxOuGtk.png.preview.jpg"/>

###### None

```ts
@Component({
    selector: 'app-none-component',
    template: `
        <div class="none-component">
            <h1>None Component</h1>
            <p>
                This component is using None View Encapsulation. This means that the
                styles defined in the component's stylesheet will leak out to the rest
                of the application.
            </p>
        </div>
    `,
    styles: [`
        .none-component {
            border: 1px solid black;
            padding: 1rem;
        }

        p {
            color: red;
        }
    `],
    encapsulation: ViewEncapsulation.None
})
```

`None` 으로 설정한 경우에는 해당 컴포넌트에 선언한 스타일이 글로벌로 적용된다.

<img alt="" class="lazy" data-src="/resources/media/images/content/2023/10/16/2023101621_QkpwJkrY7VLxznk4Oeik.png" src="/resources/media/images/content/2023/10/16/2023101621_QkpwJkrY7VLxznk4Oeik.png.preview.jpg"/>

결과는 아래와 같다.

<img alt="" class="lazy" data-src="/resources/media/images/content/2023/10/16/2023101621_qZ3y2RPA2Er7zIGcE3di.png" src="/resources/media/images/content/2023/10/16/2023101621_qZ3y2RPA2Er7zIGcE3di.png.preview.jpg"/>

재밌는 점은 생성한 3가지 컴포넌트를 동시에 표기한 경우에 `ShadowDom` 으로 선언한 컴포넌트의 텍스트 색상이 빨간색으로 표시된다. 쉐도우 루트안에 스타일 태그가 생성될 때 모든 컴포넌트가 가지고 있는 스타일이 포함되어 이와같은 현상이 생기는 것으로 보인다.

<img alt="" class="lazy" data-src="/resources/media/images/content/2023/10/16/2023101621_ZgQs0wYapryBTImAjIyZ.png" src="/resources/media/images/content/2023/10/16/2023101621_ZgQs0wYapryBTImAjIyZ.png.preview.jpg"/>

#### Data Binding

`@angular/core` 의 `Input` 데코레이터를 사용해 외부로부터 입력받는 값을 만들 수 있다.

```ts
import { Input } from '@angular/core';

@Input() firstName
@Input() lastName
```

간단한 예시

```ts
@Component({
    selector: 'app-child-component',
    template: `
        <p>{{ firstName }}</p>
        <p>{{ lastName }}</p>
    `,
})
export class ChildComponent {
    @Input() firstName?: string;
    @Input() lastName?: string;
}
```

```ts
@Component({
    selector: 'app-parent-component',
    template: `
        <app-child-component [firstName]="firstName" [lastName]="lastName">
        </app-child-component>
        <button (click)="handleChangeClick()">Change</button>
    `,
})
export class ParentComponent {
    firstName = "Jino"
    lastName = "Bae"

    handleChangeClick() {
        this.firstName = "Aram"
        this.lastName = "Kim"
    }
}
```

아래와 같이 getter, setter를 사용해서 인풋을 핸들링도 가능하다.

```ts
private _firstName = '';

@Input()
get firstName(): string {
    return this._firstName + '!';
}
set firstName(firstName: string) {
    this._firstName = firstName;
}
```

#### Event Binding

`@angular/core` 의 `Output` 데코레이터와 `EventEmitter` 객체를 사용해서 외부로에 값을 전달할 수 있다.

```ts
import { EventEmitter, Output } from '@angular/core';

@Output() onLike = new EventEmitter<void>();
```

간단한 예시

```ts
@Component({
   selector: 'app-child-component',
   template: `
       <button (click)="onLike.emit()">
           Like {{ hasLiked ? '❤️' : '🤍' }}
       </button>
   `,
})
export class ChildComponent {
   @Input() hasLiked?: boolean;
   @Output() onLike = new EventEmitter<void>();
}
```

```ts
@Component({
   selector: 'app-parent-component',
   template: `
       <app-child-component [hasLiked]="hasLiked" (onLike)="handleLike()">
       </app-child-component>
   `,
})
export class ParentComponent {
   hasLiked = false

   handleLike() {
       this.hasLiked = !this.hasLiked
   }
}
```

`emit` 할 때 값을 던져주면 부모에서 해당 값을 받을 수 있다.
